Installation of corrugated plates – The even surface determines the tightness of the cover on the longitudinal and transverse overlaps of the panels. The top surface of the formwork or lat should form the plane of the roof slope with right angles at the corners of the slope edges (tj. eaves and gable edge or ridge and roof edge). The evenness of the ground and the perpendicularity of the edges can be checked by stretching the cord diagonally between opposite corners of the slope and measuring twice the length of the cord along two diagonals.
After finding the unevenness of the upper surfaces of the battens, these battens should be properly wedged in order to create an even upper surface on the entire roof surface.. The panels should be installed from the leeward side at the bottom of the roof in the opposite direction to the prevailing wind direction from the gable to the gable and from the gutter to the ridge of the roof. It is recommended to stack the boards staggered, starting every second row with a board cut lengthwise in half (width 5 fal).
 The order of installation of roof panels on the roof slope: A – mounting direction, B – overlap parallel to the eaves, C – plant perpendicular to the eaves, D – Hood, E – gable edge, F – roof battens.
Mating starts from the eaves. In the case of eaves without gutters and gutter stripes, the boards should protrude beyond the eaves edge at least 3-5 cm, a max 7 cm. In the case of the eaves secured with a gutter strip made of steel sheet, the bottom edge of the panels is withdrawn from the eaves edge on 8 do 10 cm, while the sheet metal of the gutter flange should have this width, that it goes under the roof covering with a minimum overlap 15 cm.
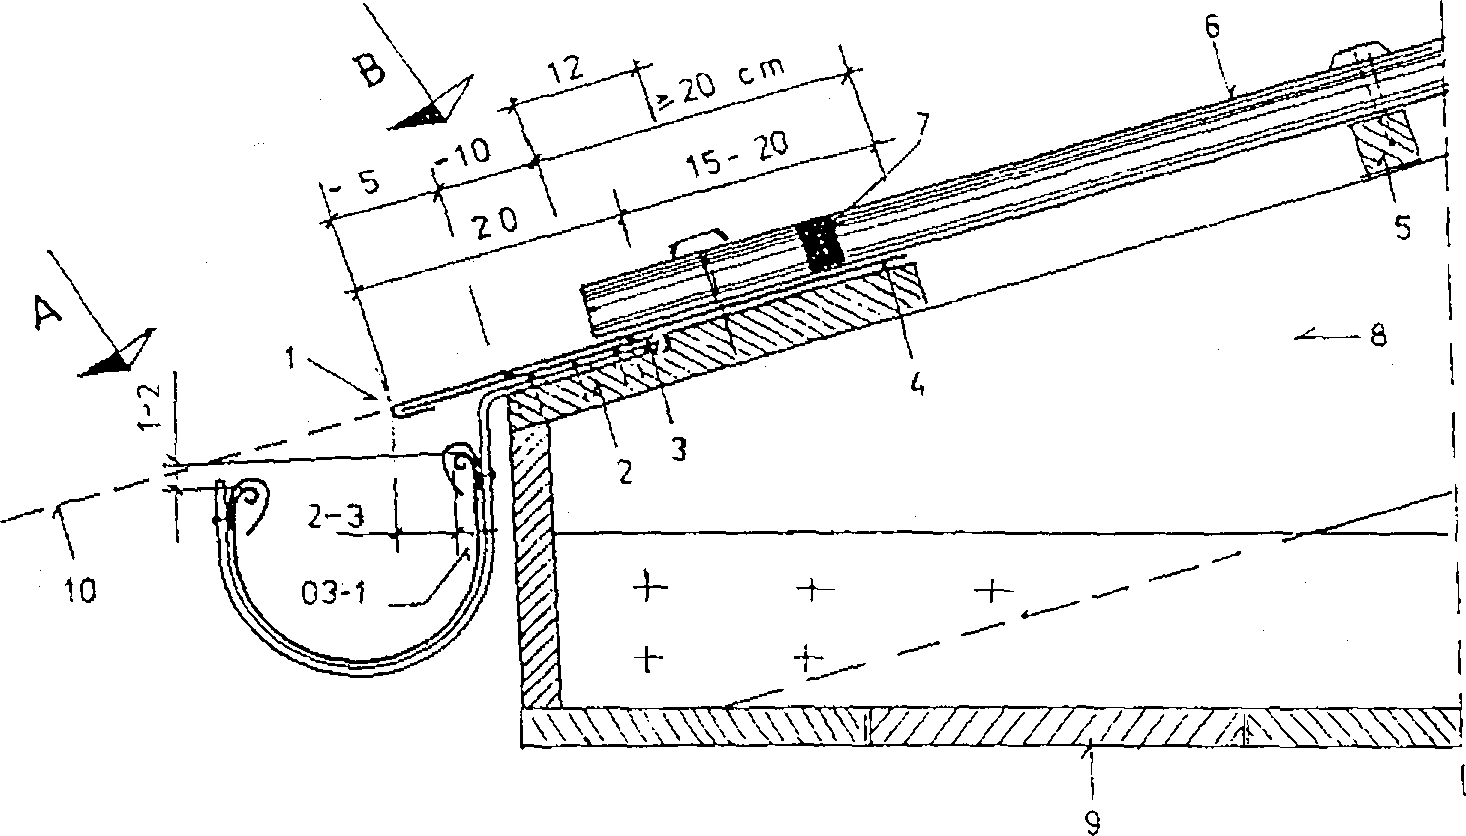 Hanging gutter and eaves solution when covering the roof with corrugated sheets: A – tolerance of the position of the gutter edge relative to the plane of the roof slope, B – withdrawal of the edge of the corrugated sheets from the edge of the eaves; 1 – edge of the gutter strip, 2 – eaves board,
3 – sheet stiffening the gutter flashing, 4 – sheet metal of the gutter strip, 5 – patch for corrugated plates, 6 – corrugated plate, 7 – a sealing insert between the corrugated plate and the eaves plate,
8 – roof rafter, 9 – eaves decking, 10 – the plane of the roof slope.
Special nails with a conical plastic head or a flat head with a sealing washer made of PVC should be used to connect bituminous plates with the substrate.. Nails should be hammered perpendicularly to the battens through the crest of the wave in this way, so as not to deform the disc.
When the board is correctly positioned on battens or formwork, you can proceed to fixing it. Be sure to check before hammering nails, whether the overlaps parallel to the eaves and perpendicular to it have the required width. To keep the nail line straight on the board surface, you can use a string. The boards are nailed to the substrate at the seams (plants) parallel to the eaves through each wave, while on intermediate patches, alternately through every second wave.
A minimum is required 20 pcs. nails for one plate. The correct order of hammering them on the laps between the boards, tj. first through the first and penultimate waves, it will protect the board against its deformation during fastening to the base.
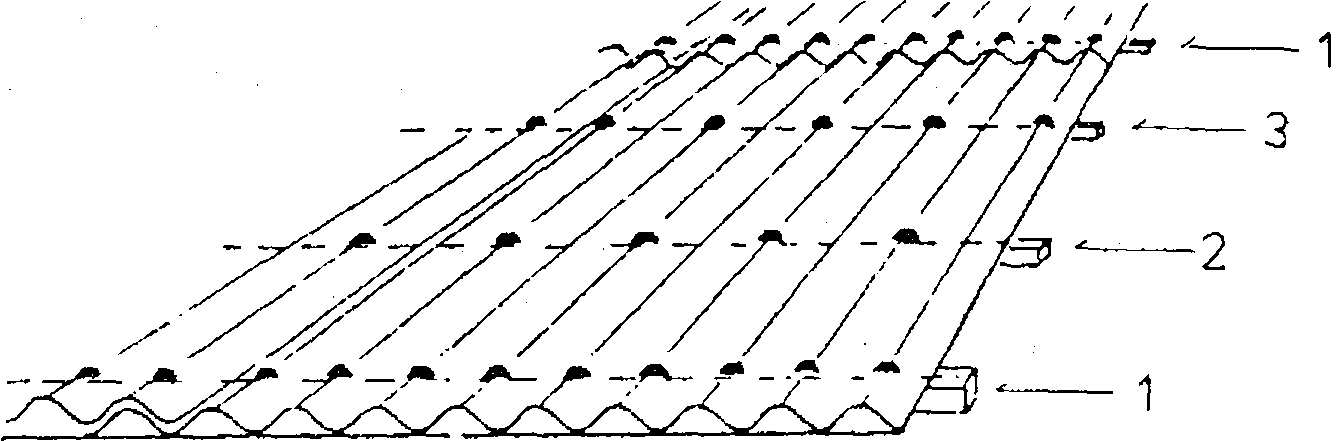 The method of nailing corrugated sheets to the substrate (to the patches): 1 – battens at the edge of the eaves or under the joint parallel to the eaves, 2 i 3 – intermediate patches.
At the edges of the roof, near the chimneys, roof windows and other roof penetrations, it is recommended to compact the number of nails on the intermediate battens (on every wave). In practice, cutting boards with hand saws is impractical, therefore the use of chainsaws is recommended for more cuts. Due care should be taken in these cases due to the high adhesion of the cut boards (soaked in bitumen) to the hot cutting discs of saws.