 Subsoil – cement screed, pavement asphalt or load-bearing base for hardboard flooring – it must be completely flat and dry. A putty, floorless substrate is not suitable for this. If necessary, the tested screed heights can be carried out for this work.
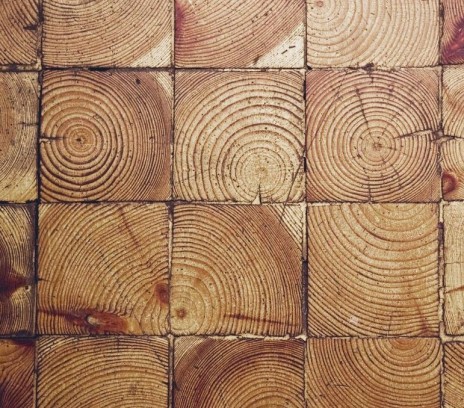
We must be sure, that the penetration of moisture into the wooden cube is excluded.
At all walls limiting the laying area, strips of insulating material are placed (grub. 20 mm). Then it is attached to the floor parallel to the wall or perpendicular to the other wall as a bumper bar.
The distance to the wall should be a multiple of the width of the block (5-8 blocks),
The adhesive is then applied with a notched trowel, recommended by the manufacturer of the wooden cube. The glue application area can only be as large, so that while the glue is hardening it can be covered with wooden blocks. The contacts of the blocks are arranged from row to row as shifted by half the size of the block. It starts with placing the first row directly next to the bumper bar and a few blocks are placed strictly next to each other in the adhesive layer. Currently, the second row is starting with a half block (split).
The third row starts with the whole brick again. The last row is then in contact with the edge strip of the insulating material. The blocks must not be glued together.
When the first plane is covered with glue, will be lined with bricks, it is stated how long it takes to lay a specific surface. This should be followed when applying the next batch of glue.
Pads often have to be fitted on heating pipes or on sloped walls.
For this, they are fitted with an ax. At least heating pipes or other obstacles inside the laying surface should be left 15 mm expansion distance. Gap, remaining after laying can then be closed with putty, durable flexible (silicone rubber).
Cutting with an ax is very simple, because it chipped off in the direction of the wood grain. Who is less confident in handling an ax, should work with a hammer and a wide flat chisel.
A square timber is wedged in the door openings between the door frames. When an adjacent room is also made in a wooden cube, installation can be made as transitional. The square block limits the wooden cube only temporarily. However, if the wooden cube is to border on another floor covering, there must be an expansion joint. It is then closed with a carefully flexible putty in the color of wooden cubes.
Once the entire floor has been laid and the glue has hardened (follow the instructions of the adhesive manufacturer) the entire wooden cube must be completely sanded.
Floor grinders are best suited for this (parquet), which work like a kind of big belt sander. They can be rented at some DIY fairs.
In order to use the sander, a large amount of suitable sanding paper in the form of belts is required. In the case of more or less uneven surfaces of the wooden cube, it is recommended to sand with sandpaper 80, and before sanding with fine grain paper 150. When there is no floor grinder, you can also – however, with much more effort – grind with a powerful belt grinder.
Finally, the wooden cubes can be preserved or waxed. All commercial parquet flooring preservatives are suitable for maintenance. However, they are often mixed with highly fragrant and often harmful to health solvents. Maintenance with hardened oil does not raise any health concerns. Since hardened oil is also diluted with natural easily oxidizing oils, the rooms should be thoroughly ventilated during and after each processing.