 When finishing the interior of the attic apartments, insulate the floor above the upper inter-story ceiling and prepare a carpet for laying.. Dry screed elements made of plasterboard or gypsum fiber are ideal for this, which have a rigid foam insulation layer on the underside.
These boards are lightweight, so easy to transport; it is also beneficial, that, unlike laying a wet screed, no moisture is introduced into the house and the finish can be done efficiently and without waiting.
Since the walls and slopes of the roof have been covered with plasterboards, any residual mortar is reflected from the raw ceiling and it is carefully swept.
In order not to transmit the sound of footsteps through walls and ceilings, first place strips of insulating material around the surface of the installation (thickness 10-20 mm). These strips should protrude above the board level at their height.
A polyethylene foil is then laid on the raw ceiling, that any building moisture cannot penetrate the floor structure. In addition, this prevents the formation of condensation in the area of the floor structure. As a rule, foils, commercially obtainable, are large enough for rooms of average size. When it is necessary to lay several strips of foil, they are placed with an allowance of approx. 30 cm.
It is not allowed to lay foil on wooden beam ceilings, forming a vapor barrier, as the wooden parts would be damaged due to the formation of mold.
The finished screed elements are equipped with rebates around, which allow the plates to be joined with tight gaps. When fastening, the boards are glued together to form a large floor board. A special adhesive recommended by the panel manufacturer should be applied to the rebates using an extruding gun. Under no circumstances should the screed elements be nailed to the floor or screwed in with screws, because in this way the sound of footsteps would be transmitted to the ceiling lying below.
The panels are fastened in one corner of the room and then placed in “falling lengths”. Remnants of the last record of the first row (if it measures at least 50 cm) used as starting second order art. This avoids cross gaps and unnecessary waste, When fixing, the plates should always be placed on the adjacent plate along their entire length. Then they are pushed against each other by light tapping with a hammer, for tight gaps.
After just a few hours, the installation of the entire floor is finished. After filling and sanding the inter-tile joints, it is best prepared for laying carpet..
When two strips of carpet are laid, starts with gluing in the weld zone. After carefully measuring, put both carpet strips back, namely one by approx. 30 cm, and the second by approx. 1 m. Apply glue to the entire free surface of the floor, and then the placed glue strip is unwound. When the second strip is unrolled, the seam is tightly closed. The seat belt back covers should not touch each other. Through the back of the belt withdrawn only by 30 cm, a tight joint of the joint is obtained.
First they are cut with a carpet knife, smooth movement, strips of insulating material protruding at the edge of the floor surface.
The carpet is then unrolled over the floor surface and placed in the intended position. The carpet is now cut exactly to the size of the floor using a hook blade.
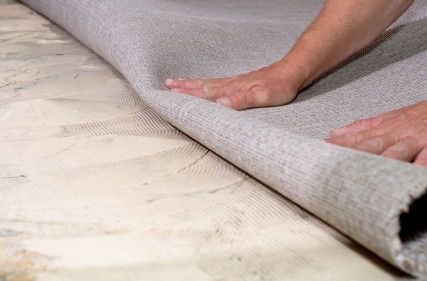
The carpet is rolled up in the edge zone for approx. 1 m.
The carpet glue is first applied roughly to a free floor area.
Glue “he combs himself” evenly notched trowel. Special attention must be paid to the even application of the glue in the corners, without uncovered places.
After the specified time has elapsed since the fit, the coverings unfold into the adhesive layer.
The carpet should be rubbed with a piece of board with rounded edges. The covering can still be slightly corrected in its position, preferably by sliding and rubbing with a piece of board. Any air bubbles are squeezed out towards the edges. At the edges, you can rub the edges of the carpet with a hammer.
Now the carpet is rolled up from the other side of the room to the sticking points. The adhesive is reapplied evenly on the floor and “combs”. After the evaporation time, the covering unfolds onto the adhesive layer and rubs off.
For large floor areas, it is recommended to work on several partial surfaces. It is important here, that the floor covering is lapped towards the side not yet glued. After laying, the carpet must not be walked on until the adhesive hardens.
The skirting boards are poison-free and dust-free to be attached with a special construction adhesive from a squeezed tube. Troublesome drilling and screwing are avoided.
First, all the skirting boards are cut to the required size with a fox saw. Start at the corners, trimming the slats in the 45 ° trimming machine. By positioning all the skirting boards at the edge of the floor surface, the exact dimensions and angles can be determined.
For fixing, a continuous, serpentine strip of construction adhesive is squeezed from the tube onto the back wall of the skirting board.
After embedding and adjusting the skirting board, it is pressed firmly, or it kills a bit.